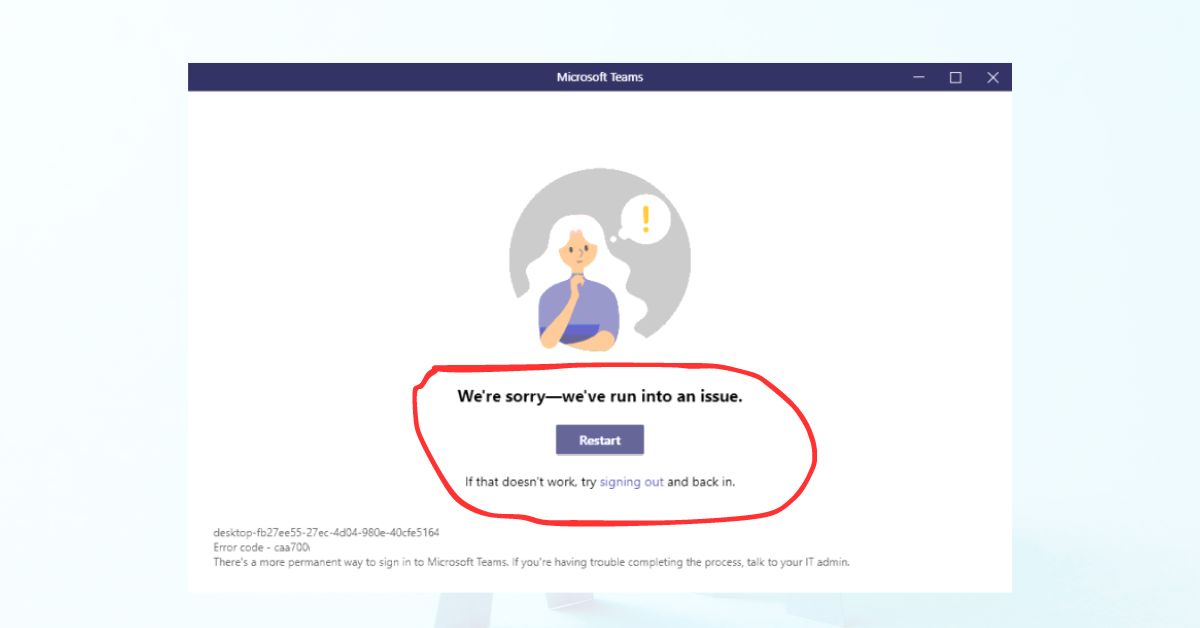
Microsoft Teams has become a cornerstone for seamless communication and collaboration among teams worldwide. However, encountering errors, such as the commonly seen “We’re sorry—We’ve run into an issue“, can disrupt productivity and cause frustration. Understanding the root cause and resolution methods is pivotal to maintaining uninterrupted workflow.
When confronted with this error message “We’re sorry—We’ve run into an issue,” it’s essential to delve deeper into its meaning. Often, it indicates underlying issues with connectivity, software conflicts, or outdated components within MS Teams.
Resolving the error requires systematic troubleshooting. Initiating with basic checks like restarting the application and device, followed by more advanced measures, can often resolve the issue swiftly.
Jump To Section
In this article you will find troubleshooting steps to fix ms teams error “We’re sorry—We’ve run into an issue”, so that you can use your ms teams without any mental stress.
Reason for Microsoft Teams Error We’re sorry—We’ve run into an issue
Here is the list of potential reasons which could trigger the error “We’re sorry—We’ve run into an issue” in MS Teams.
- Network Connectivity Problems: Unstable or poor internet connection can lead to communication issues with MS Teams servers, triggering the error.
- Outdated MS Teams Version: Running an outdated or unsupported version of MS Teams might result in compatibility issues or known bugs, causing the error message.
- Cache and Data Issues: Accumulated cache or corrupted data within the application can lead to conflicts, resulting in the error.
- Firewall or Antivirus Restrictions: Overly restrictive firewall or antivirus settings may block MS Teams’ necessary connections, leading to the error.
- Server-Side Problems: Temporary issues or maintenance on Microsoft’s servers hosting MS Teams services can cause the error.
- Corrupted Installation Files: Any corruption in the installation files of MS Teams can cause malfunction and prompt the error message.
- Operating System Compatibility: Compatibility issues between the operating system and MS Teams could lead to errors during operation.
How to Fix Microsoft Teams Login Error?
1. Restart MS Teams
Try restarting MS Teams by completely closing the application and then reopening it to see if the error persists. Sometimes, a simple restart can resolve temporary glitches or issues within the software. This can be a quick fix to the problem you’re encountering.
2. Check Internet Connection
Ensure stable and active internet connectivity as network issues can trigger this error. You have to Prioritize validating your internet connection to guarantee its stability and activity. This step is crucial as fluctuations or disruptions in your network often act as triggers for the specific error encountered within MS Teams. Ensuring a consistently stable and active internet connection serves as a foundational step in troubleshooting, significantly reducing the likelihood of encountering issues related to network instability while using the platform. You can do a speed test at speedtest.net and make sure your minimum speed is 5Mbps for good and stable working of teams.

3. Clear Cache and Cookies
Clearing the teams cache is a user-friendly solution to address login problems arising from problematic cache files. This process effectively resolves potential issues caused by corrupted or outdated teams cache data, ensuring a smoother teams login experience within Microsoft Teams. Follow these steps to clear MS teams cache:
A. Open Task Manager:
- To access Task Manager, press Ctrl + Shift + Esc on your keyboard.
- Alternatively, right-click on the taskbar and select “Task Manager” from the menu that appears.

B. Close Microsoft Teams:
- In Task Manager, locate the “Microsoft Teams” process.
- Click on “Microsoft Teams” to select it.
- Click the “End task” button located at the bottom right corner of the Task Manager window.
- This ensures that Microsoft Teams is completely closed before proceeding to clear the cache.

C. Access File Explorer:
- Right click on Task Bar.
- Click on the File Explorer icon on your taskbar or find it in the Start menu.

D. Navigate to Cache Folder:
- Once in File Explorer, click on the address bar at the top of the window.
- Type or copy and paste
%appdata%\Microsoft\teams\Cacheinto the address bar and hit Enter. - This action takes you directly to the folder where the cache files for Microsoft Teams are stored.

E. Delete Cache Files:
- Inside the Cache folder, press Ctrl + A to select all files.
- With all files selected, press Shift + Del to permanently delete them.
- Confirm the deletion if prompted, and allow time for the deletion process to complete.

F. Repeat for Additional Paths:
- After deleting files in the Cache folder, repeat steps 4 and 5 for the following paths:
%appdata%\Microsoft\teams\application cache\cache%appdata%\Microsoft\teams\blob_storage%appdata%\Microsoft\teams\databases%appdata%\Microsoft\teams\GPUcache%appdata%\Microsoft\teams\IndexedDB%appdata%\Microsoft\teams\Local Storage%appdata%\Microsoft\teams\tmp
- In each folder, select all files using Ctrl + A, then delete them using Shift + Del.
G. Delete all files in each folder:
- Ensure all files in each folder are selected before deleting them to completely clear the cache from these locations.
H. Delete Teams Folder:
- Alternatively, you can also delete everything in teams folder at this location [%appdata%\Microsoft\teams] rather deleting all internal files and folders one by one.
These steps thoroughly guide you through accessing various cache folders related to Microsoft Teams and deleting their contents to clear the application’s cache data.

4. Run MS Teams in Compatibility Mode
Change compatibility settings to troubleshoot compatibility issues with the operating system. Here are the steps to follow:
- First of all locate MS Teams Application, Find the MS Teams application icon on your desktop or in the Start menu.
- Now Right-click on MS Teams, Right-click on the MS Teams icon to reveal a dropdown menu.
- From the dropdown menu, select “Properties.” This will open a window with various tabs.

- Navigate to Compatibility Tab in the Properties window, locate and click on the “Compatibility” tab.
- Look for an option that says “Run this program in compatibility mode for:” and check the box next to it.
- From the dropdown menu below the checkbox, select the version of Windows you want to run MS Teams in compatibility mode for. You can choose an earlier version of Windows than yours, if you suspect compatibility issues. If you have win 10 or win 11 then choose win 8 here.
- Once you’ve selected the compatibility mode, click “Apply” and then “OK” to save the changes.

Now, Try opening MS Teams again to see if running it in compatibility mode resolves the issue you were experiencing. This way we can fix ms teams error.
5. Clear MS Teams Credentials From PC
Here are the steps to clear stored credentials for MS Teams from the Credential Manager:
- Click on the Start menu, then type “Control Panel” in the search bar. Open the Control Panel from the search results.
- Access Credential Manager, Within the Control Panel, locate and click on “Credential Manager.” It’s usually found under the “User Accounts” or “Credential Manager” section.
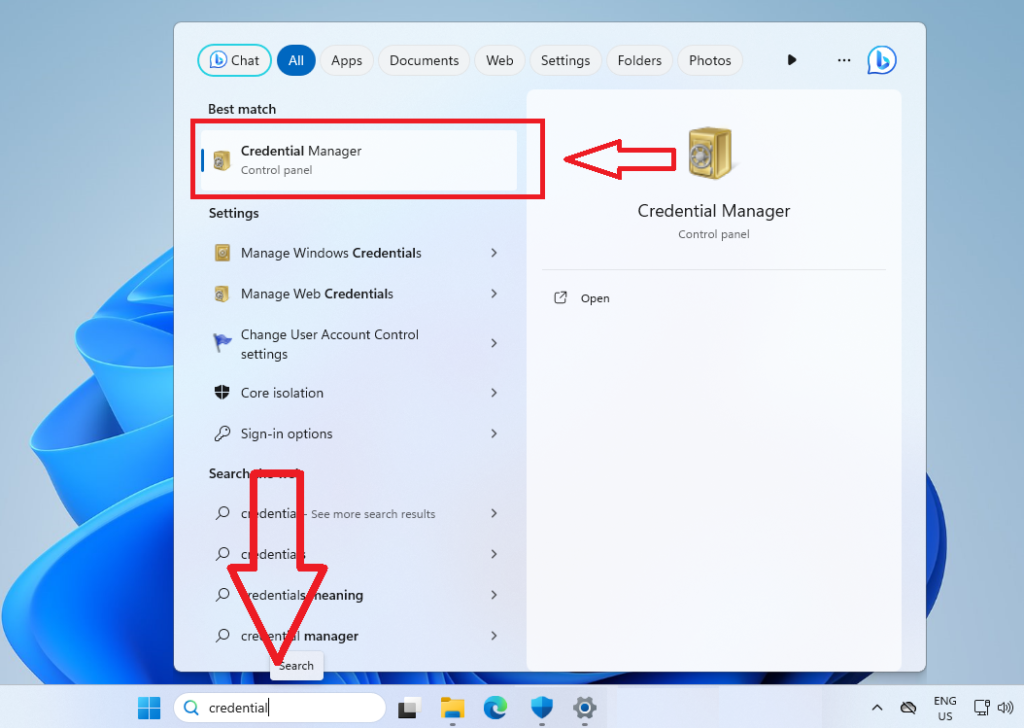
- In Credential Manager, you’ll find options to manage Windows credentials. Click on “Windows Credentials” to view the stored credentials.
- Remove Credentials, Look for any credentials related to MS Teams or Microsoft accounts that might be causing issues. Click on the credential to expand it, then select “Remove” or “Remove from vault.”
- Confirm the action if prompted. This will delete the stored credentials associated with MS Teams or Microsoft accounts.

- Close MS Teams completely and reopen it to check if the issue has been resolved after clearing the Credential Manager.
Clearing the Credential Manager removes saved login information that might be causing authentication or login issues with MS Teams. This can help resolve problems related to stored credentials conflicting with the login process.
6. Update Current Date and Time as Per Your Time Zone
Correcting the system’s time zone settings can resolve all Microsoft teams error issues that arise from incorrect time configurations. This adjustment ensures that Microsoft Teams can communicate properly with the server, potentially resolving login problems related to time discrepancies which also includes error We’re sorry—We’ve run into an issue.
Here are detailed steps to adjust the system time zone to potentially resolve login issues in Microsoft Teams:
- To Access Date and Time Settings, Right Click on the clock icon in the taskbar (bottom-right corner) of your screen.

- Now to Open Date and Time Settings, Select “Adjust Date and Time” from the menu that appears.
- Once its opened then Navigate to Time Zone Settings in the Date and Time settings window, find the section related to “Time zone.”
- To Adjust Time Zone, Click on the drop-down menu to choose the correct time zone corresponding to your location. Make sure “set time automatically” is enabled
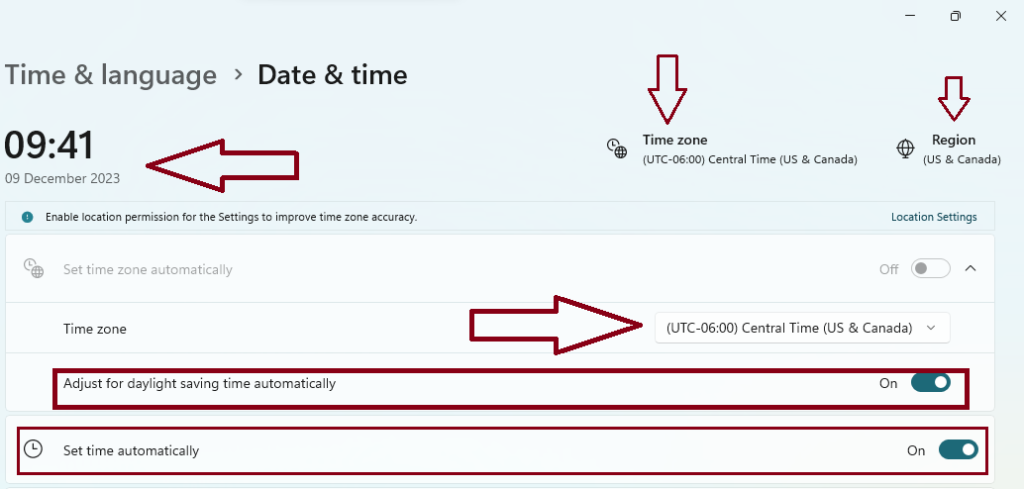
- Verify Date and Time Accuracy and Ensure that date and time displayed are accurate for your time zone.
- Restart Your Computer to ensure the adjustments take effect system-wide, consider restarting your computer.
7. Disable Network Proxy
Disabling proxy settings stops your device from routing internet traffic through a proxy server. Sometimes, proxy configurations can interfere with the proper functioning of applications like Microsoft Teams, causing connectivity issues. This adjustment ensures a direct connection to the internet, potentially resolving problems related to proxy configurations impacting Microsoft Teams’ connectivity.
Here’s a detailed step by step guide on how to disable proxy settings in Windows, which can help resolve connectivity issues with Microsoft Teams:
- Click on the Start menu (Windows icon) located at the bottom-left corner of your screen. Select the “Settings” icon (resembling a gear or cogwheel), which will open the Settings window.

- Now , Within the Settings window, locate and click on “Network & Internet.”
- On the left-hand sidebar of the Network & Internet settings, find and click on “Proxy.”
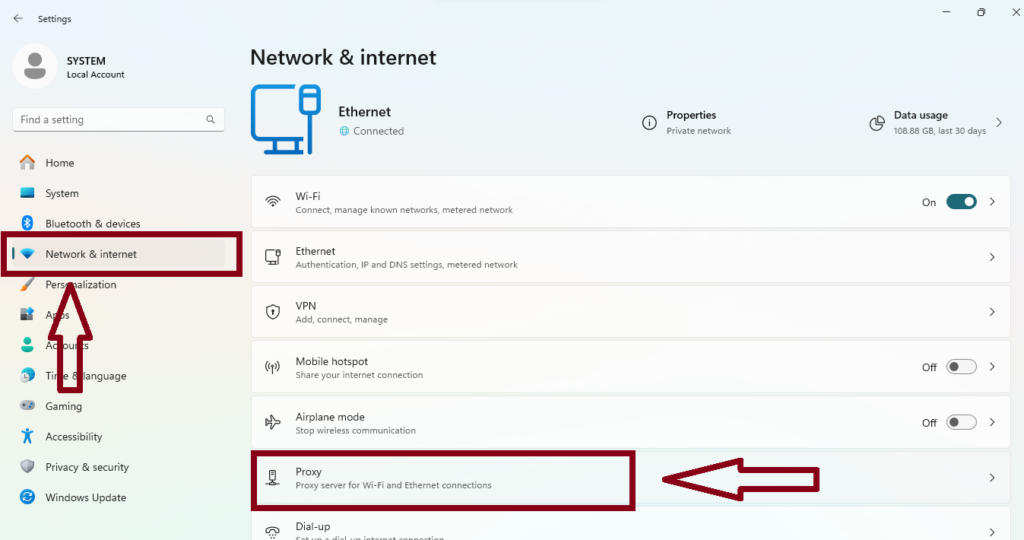
- To Disable Proxy, Under the “Manual proxy setup” section, you’ll see a switch for “Use a proxy server.” Toggle this switch to the “Off” position. Turning off this switch disables the use of a proxy server on your device, allowing direct connection to the internet.

- If “Automatically detect settings” is available and enabled, it’s beneficial to keep this setting on. It aids in automatically identifying proxy settings based on your network configuration. You can turn it off and turn it back on.
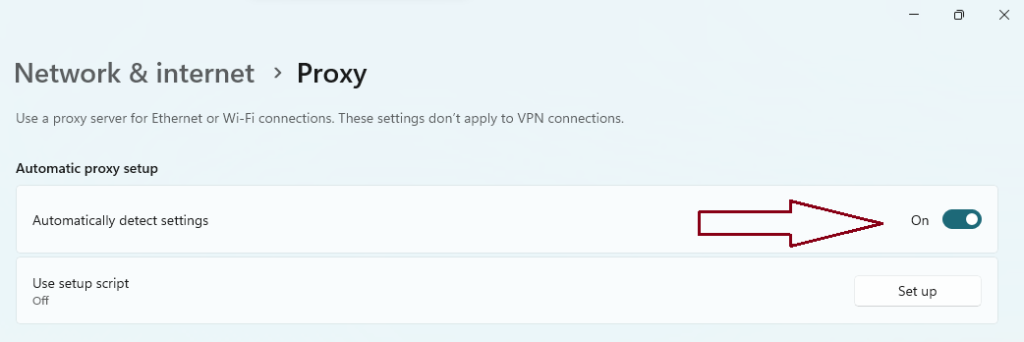
After disabling the proxy settings, close the Settings window to ensure changes are saved.
8. Check for Conflicting Apps
Identify and uninstall any recently installed apps that might conflict with MS Teams. By identifying and terminating conflicting applications or processes that might impact MS Teams’ performance, you can potentially mitigate any interference or resource competition, allowing MS Teams to function smoothly and without disruptions.
- Ensure that MS Teams is completely closed before proceeding to check for any conflicting applications.
- Press Ctrl + Shift + Esc to open Task Manager on Windows to review the list of currently running processes and applications.
- Scan through the list of running processes and applications. Look for any programs that might potentially conflict with MS Teams. These could include resource-intensive applications, security software, or other communication tools.
- Identify the applications or processes that could potentially interfere with MS Teams’ operations. Right-click and select “End task” to stop these processes.
- Restart MS Teams after ending or disabling conflicting applications or processes, relaunch MS Teams to verify if the issue has been resolved.

9. Update Operating System
Ensure your operating system is updated to the latest version to maintain compatibility with MS Teams. Updating your operating system through regular Windows updates is crucial. It ensures your system has the latest security patches, bug fixes, and enhancements provided by Microsoft. This practice can potentially resolve MS Teams errors by addressing underlying system issues that might affect its performance or functionality.
Here’s a step by step detailed guide on updating your operating system, potentially resolving MS Teams errors:
- Click on the Start menu (the Windows icon usually located at the bottom-left corner of the screen).
- Select “Settings” (depicted by a gear or cogwheel icon). This action will open the Settings window.
- Within the Settings window, look for and click on “Windows Update.” It’s usually represented by an icon with two circular arrows.
- In the Windows Update window, you’ll find various options related to system updates. Click on “Check for updates.” This initiates a scan by your system to identify any available updates from Microsoft servers.
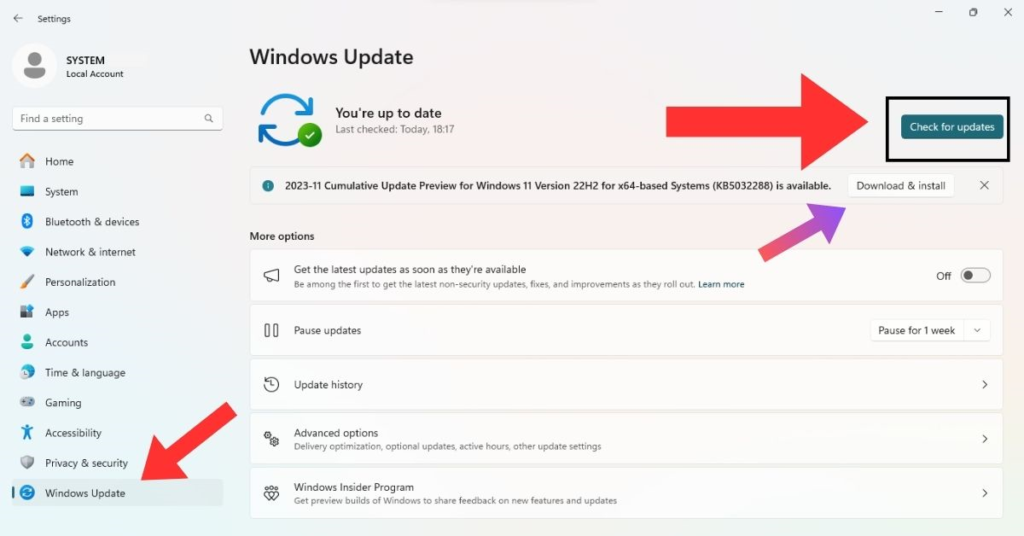
- If updates are found, your system will display information about the available updates.
- Click on “Download & Install” to start downloading the updates. Once downloaded, It may ask to click on “Install” to commence the installation process.
The installation duration varies depending on the size and number of updates. Your system might need to restart during this process. After the updates are installed, your computer will prompt you to restart. Ensure to save any ongoing work, then proceed to restart your computer to complete the installation of updates.
10. Uninstall & Reinstall Updated MS Teams
This is the final troubleshooting step which you can follow to fix Microsoft teams error We’re sorry—We’ve run into an issue. This is to uninstall MS teams application and reinstall the updated version of it.
A. Uninstall MS Teams:
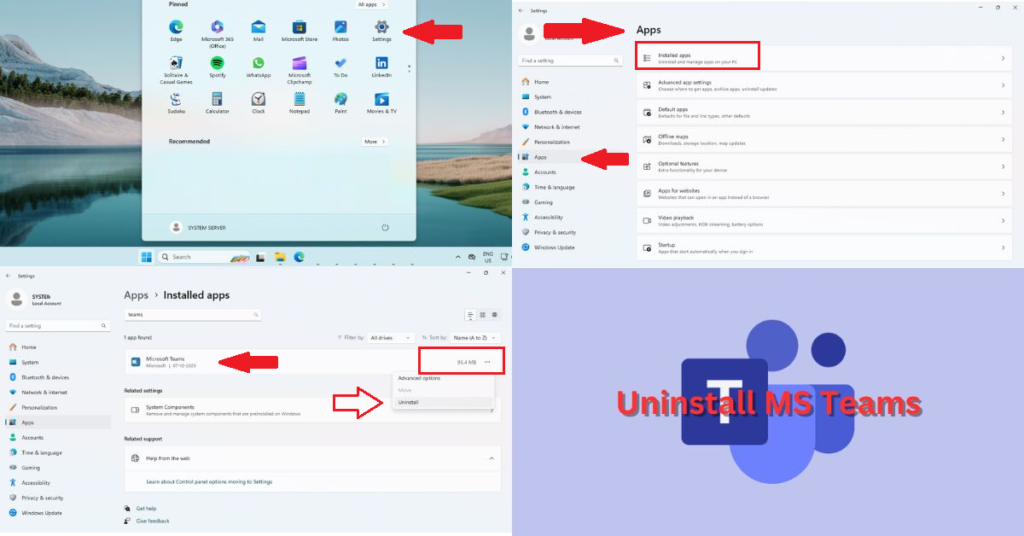
- Click on the Start menu (the Windows icon) at the bottom-left corner of your screen, then select “Settings.”
- Access “Apps” or “Add or Remove Programs”, Within the Settings window, find and click on “Apps” or “Add or Remove Programs,” depending on your Windows version.
- Go to Installed Apps, Find Microsoft Teams here, Scroll through the list of installed applications to locate Microsoft Teams.
- Click on Microsoft Teams and select “Uninstall“, this will further give drop down to Uninstall. Follow the on-screen prompts to complete the uninstallation process.
B. Download the Latest Version:
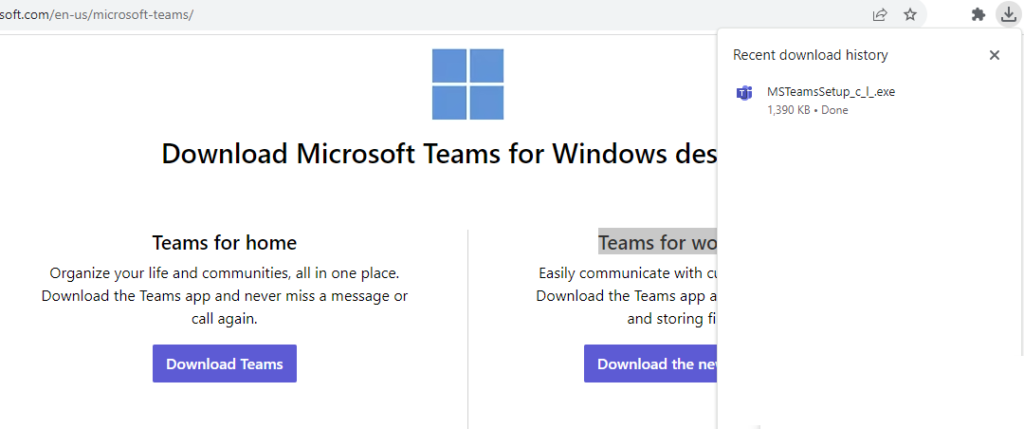
- Open a web browser and go to the official Microsoft Teams website and scroll down.
- There you will find 2 options to download MS teams application, You can choose which one you want to download as per you need.
- For personal teams you can click on “Teams for Home” and for work purpose you can click “Teams for work or school“.

C. Install MS Teams:
- Run Installation File, Once the download finishes, locate the downloaded file MSTeamsSetup_c_l_.exe and double-click it to run the installation process.
- Follow the installation wizard’s prompts to install Microsoft Teams on your computer.

Launch MS Teams:
- After installation, locate Microsoft Teams in your pc through the Start menu.
- Launch the application and enter your login credentials to sign in and access Microsoft Teams.
Reinstalling Microsoft Teams with the latest version often resolves persistent issues by ensuring you have the most up-to-date and stable version of the application installed on your system.
Contact Microsoft Support
If the error persists, reach out to Support at help.microsoft.com talk to a person for advanced troubleshooting assistance.
